- 🍄 Side pins form due to high-humidity, low-light small areas near tub walls.
- 🔦 Lighting direction greatly influences pin placement in mushroom cultivation.
- 💧 Improper moisture control is the most frequent cause of side pin formation.
- 🌬️ Not enough airflow makes pins grow in oxygen-starved cracks.
- 🧪 Mycology-grade liners can reduce side pin formation by creating an air and light block.
If you use a monotub to grow mushrooms, you might see tiny mushroom caps along the sidewalls. People call these "side pins." They can be a problem. You can harvest them, but they usually mean something is off in your grow environment. In this guide, we will look at what causes mushroom side pins. We will also see why they make growing less effective, and what steps you can take to stop them from forming in your monotub. Side pins can show up in monotubs, but with the right setup they’re easy to manage. Monotubs can lead to side pins and wasted harvests. Our grow bags are a hassle-free alternative, giving your mushrooms the right environment to grow where they should—no side pins, just healthy flushes.
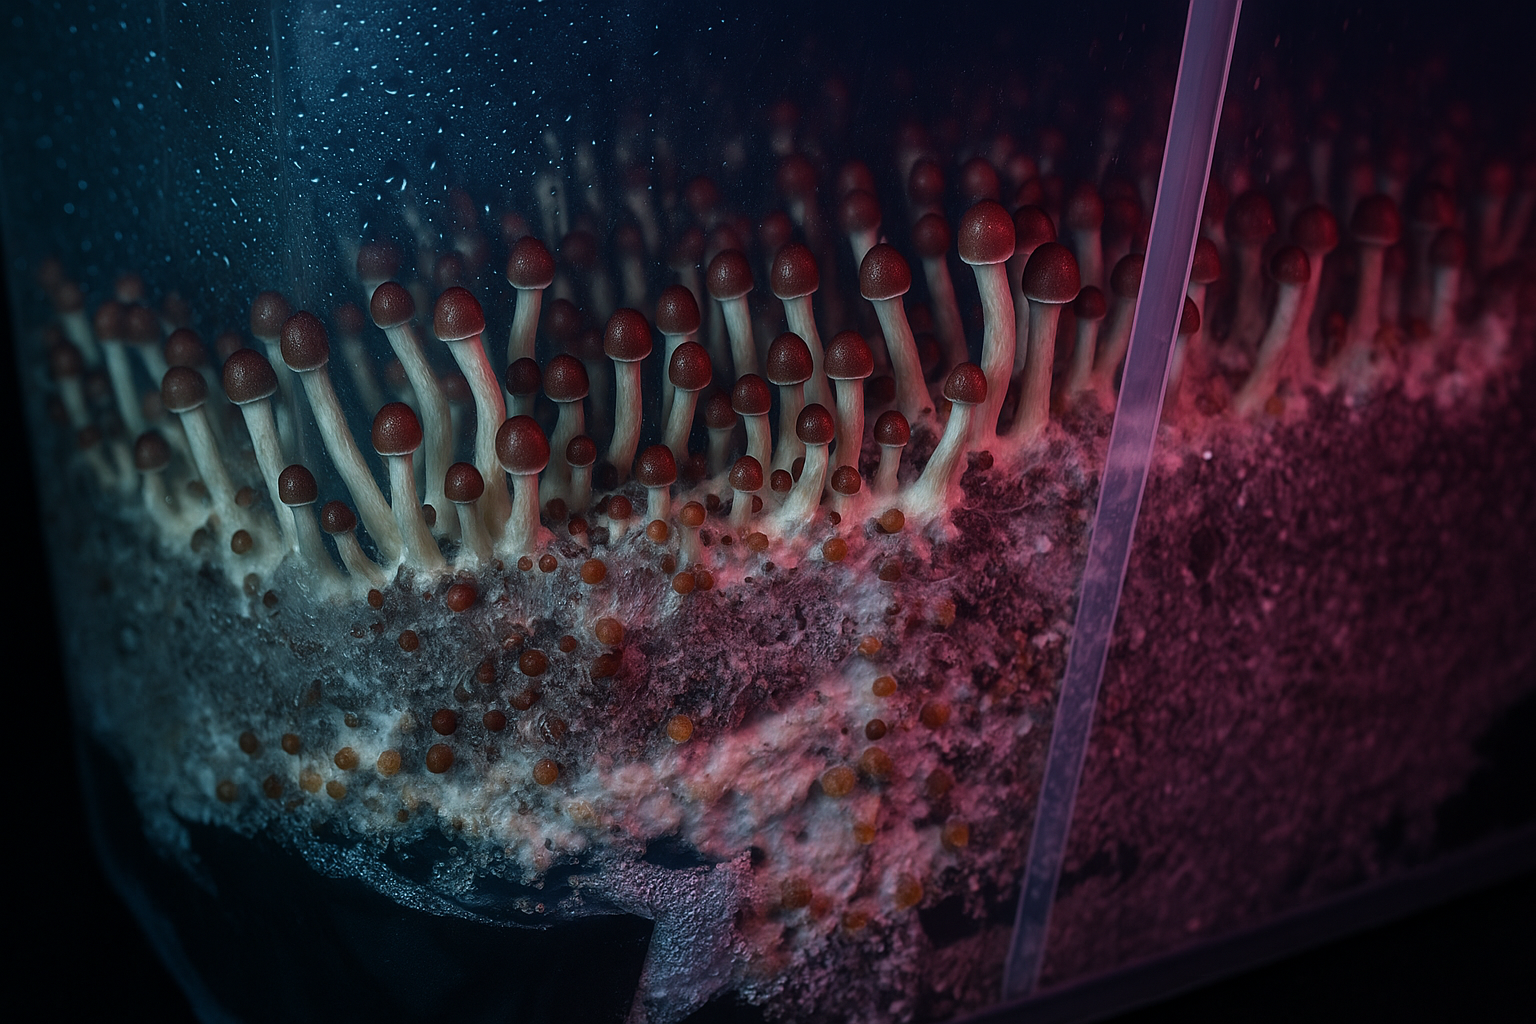
1. What Are Mushroom Side Pins?
Mushroom side pins are young mushrooms. They form on the side surfaces of your monotub substrate. This is instead of on the top layer, which is the best place for mushrooms to grow. These small mushrooms appear in the tight space between the substrate and the walls of the monotub. They often do this because of good conditions like high humidity and less light. This is not good for growers.
The small area created between the wall and the substrate is often more humid and a bit cooler than the top surface. If the top of the substrate does not have the right conditions for fruiting, for example, enough moisture, fresh air, or light, the mycelium sends its energy to spots that look better for mushroom growth. This happens even if those spots are hard-to-reach side areas.
Side pins are harder to see and harvest. Also, they show your monotub is not working as well as it should. A good setup should help many healthy mushrooms grow on top, where you can reach them.

2. Why Side Pins Are a Problem in Monotub Cultivation
Side pins are part of your mushroom harvest. But most growers agree they cause more trouble than good, especially in a monotub system.
Difficult Harvesting
Side pins are much harder to get to. Pulling them can scrape the tub sides or tear your substrate. This damages the mycelium. This might make later flushes happen later and lower your total yield.
Nutrient Drain
Pins are the first part of mushroom growth. They need a lot of nutrients and water. Side pins take important resources from the substrate. These resources could instead help healthy mushrooms grow on the surface. This lowers how much you grow.
Increased Risk of Contamination
When you dig near the tub walls to get rid of hard-to-reach side pins, you break up the top protective layer of the substrate. Exposing your grow to open air and bacteria, especially with bare hands or tools, greatly increases the chance of contamination.
Warning Sign of a Bigger Imbalance
Side pins are a warning sign. They tell you the small area has an imbalance. Maybe there's too little light, too much wall condensation, or not enough airflow.
In short, side pins are not bad on their own. But they are a sign of environmental problems. These problems can greatly lower how well you grow mushrooms if you do not fix them.

3. Main Causes of Side Pins in Monotubs
Understanding why side pins grow helps you prepare your setup to prevent them.
Substrate Moisture Imbalance
Mushrooms need moisture to grow, but not too much in one spot. If your substrate is too dry on top, the mycelium will try to find more moisture near the more humid edges and walls.
Not Enough Surface Humidity
A dry surface layer stops pins from growing and maturing. This often happens when you do not mist often enough or the grow room is too dry.
Not Enough Fresh Air Exchange (FAE)
Low oxygen stops pins from forming on the surface and makes them grow on the sides. If the air inside is uneven, especially near the walls and corners, your mycelium may start fruiting there instead.
Poor Light Management
Mushrooms grow toward light. If light is not directly above the substrate, or if you use clear tubs, side pins might grow. This happens because light reaches the lower walls instead of the top.
Wall Condensation
Mist that collects on the walls gives a constant source of moisture where the substrate meets the wall. This makes the substrate edge more appealing for pins to grow. This gets worse where air does not move.
All these issues can make mushrooms grow in the wrong spots. This lowers your yield and makes growing harder.

4. Substrate Preparation and Placement Tips
How you prepare and insert your substrate helps decide if you will succeed or keep having side pin problems.
Choose the Right Substrate Moisture
Check for the right amount of moisture using the field capacity test. When you squeeze the substrate, it should release only a few drops of water, not a stream. Too much water makes puddles. Too little water makes dry spots that stop surface fruiting.
Even & Firm Substrate Compression
Spread your substrate evenly across the tub bottom. Press it down gently but firmly so that it stays flat against the liner with no air gaps. If it does not touch evenly, it creates gaps. These gaps are good for side pins to grow.
Avoid Substrate Separation During Colonization
During colonization, as the mycelium uses nutrients, the substrate can shrink. It can pull away from the tub walls, creating new gaps. Using a liner correctly, as you will see in the next section, makes up for this. It can also greatly lower how many side pins form.

5. Using a Liner to Reduce Pinning Zones
Many experienced growers think liners are a very important part of growing mushrooms well in a monotub. And for good reason.
What Is a Liner?
A liner is a plastic sheet, usually black. You put it into your tub before you add your substrate. The substrate shrinks a bit during colonization and fruiting. A liner that is put in correctly shrinks with it. This keeps a tight fit. It removes places that invite pins to grow.
Benefits of Using a Monotub Liner
- Stops Light from Getting Through: Darkness near the sidewalls will stop pins from forming.
- Keeps a Clean Air Block: By getting rid of air pockets, a liner gets rid of the small area that makes side pins grow.
- Helps Top Fruiting: The walls and sides are not good for pinning. So, the mycelium puts its energy into the top surface, which has many nutrients and is easy to reach.
Zombie Mushrooms’ mycology-grade liners are made to fit exactly. They are heat-resistant, reusable, and work much better than using regular garbage bags.

6. Controlling Light Exposure
Light is not just for seeing. It is a strong signal from the environment for mushrooms to grow. Wrong lighting can make pins grow in the wrong spots.
Best Practices for Light Management
- Light Only from Above: Put your LED grow light right over the tub. This acts like natural sunlight and tells pins where to grow well.
- Being Opaque is Important: Use opaque monotubs. Or wrap clear ones with blackout tape or foil to stop light from leaking in from the sides.
- Use a Light Schedule: Use a 12 hours on / 12 hours off pattern. This gives enough light without too much.
As O'Brien et al. (2018) noted, light is one of the strongest environmental things that makes mushrooms fruit. Make sure the top of your substrate gets direct light. Keep the sides shaded. This guides pins to grow up.

7. Airflow & Humidity Management for Top-Only Fruiting
Good airflow and humidity are not just nice to have. They are very important for controlling where pins grow.
Making Fresh Air Exchange (FAE) Better
- Well-Placed Holes: Vent holes at substrate level and near the top edges help move still air around. This is true especially when stuffed with polyfill, which controls how much air moves.
- Active vs. Passive Airflow: Passive airflow works for smaller grows. But larger tubs often get help from small USB fans placed nearby. Do not aim them directly inside. Instead, use them to move air around the growing area.
Ways to Hydrate the Surface
- Mist & Fan Method: Lightly spray the top layer until it glistens. Then, fan with the monotub lid or gently wave fresh air in. Do this several times daily during fruiting.
- Avoid Overmisting: Puddles of water suffocate growing pins. They can also cause bacterial spots or rot.
- Measure Relative Humidity: Keep the room humidity between 85–95% during fruiting. Digital hygrometers help you get the exact humidity.
High humidity plus good airflow means pinning that focuses on the surface. This is because mushrooms grow where the surface has the best moisture and oxygen.

8. Condensation Management and Tub Conditions
High humidity inside can easily become poorly managed condensation if you do not control it.
Warning Signs of Bad Condensation
- Water running down the sidewalls
- Frequent fogging of the whole tub inside
- Constant wetness near substrate edges
Controlling Tub Conditions
- Adjust Room Temperature: The best range of 68–72°F stops temperature drops that cause condensation inside the tub.
- Use Adjustable Lids: Lids with built-in vents can lower inside pressure and humidity.
- Add Indirect Airflow: A small desktop fan nearby increases air movement in the room. This naturally lessens condensation without drying out the top layer too much.
9. Temperature & Environmental Factors
Unstable environment often causes pins to grow in unwanted spots.
Best Practice Guidelines:
- Steady Temperature: Keep temperatures between 68–72°F to avoid surprising the mycelium.
- Do Not Change Quickly: Sudden drafts or temperature spikes cause condensation inside and stress your substrate.
- Keep Humidity High, But Not Soaking: Use a humidifier outside the tub if the room humidity is too low. Also, use good airflow to balance it.
Growing mushrooms is about being steady. The more steady your small area, the less likely your tub will grow side pins to survive.

10. Surface Conditions: Key to Encouraging Top Fruiting
A good fruiting surface is easy to see and care for.
How to Check and Improve Your Substrate Surface
- Glistening, Not Soaking: The substrate top should have a light shine, not standing water. This shows it has enough water without being soaked.
- No Crusting or Dry Patches: If the substrate cracks or gets lighter, it means it has dried out. Mist lightly several times per day.
- Adjust How Often You Mist: As fruits grow, mist less often to avoid wet caps. You will also avoid contamination risks like fuzzy feet or rot.

11. Harvesting Strategy to Avoid Future Side Pins
How you harvest changes how the substrate's next flush grows. So, harvest with care for the future.
Better Harvesting Methods
- Twist & Lift or Use Scissors: Be gentle. Do not rip substrate chunks. Ripping creates gaps that are perfect for the next side pins.
- Surface Repair: After harvesting, add a small amount of clean casing material to make any uneven spots flat.
- Hydrate Carefully Post-Flush: Either mist a lot or bottom-water, depending on your setup, to add moisture back inside.
Damage to the substrate and drying are main reasons for future side pin growth. Careful harvesting stops these.

12. Tools & Supplies to Aid in Pin Prevention
Good gear makes the difference between luck and consistent, controlled success.
Recommended Supplies:
- Pre-Sterilized Kits: Easy for beginners. They give the best substrate amounts and containers.
- Black Plastic Liners: Shrink to fit and stop outside light.
- Hygrometers & Thermometers: Check room and tub conditions exactly.
- Misting Bottles with Fine Nozzles: Stop water from pooling due to heavy misting.
- Desktop Air Circulators: Make FAE better and lessen still, humid areas.
Buying the right materials gives you complete control over how pins grow.

13. Common Myths About Side Pins
Let's clear up a few common myths:
-
Myth: Side pins mean total failure
Reality: Even professional growers see them sometimes. It is about having fewer, not getting rid of all. -
Myth: Side pins are contaminated
Reality: Check color, texture, and smell. If normal, they are safe. -
Myth: Can't harvest side pins
Reality: They are awkward, but can be fully used. And they may be strong.
14. Summary Checklist: Preventing Side Pins in Your Monotub
- ✅ Press and level substrate evenly
- ✅ Use a black plastic liner that shrinks with substrate
- ✅ Direct light only from above
- ✅ Keep surface lightly and always wet
- ✅ Keep fresh air exchange right
- ✅ Check and lessen wall condensation
- ✅ Harvest cleanly and fix surface after each flush
- ✅ Keep temperature, humidity, and airflow steady
Controlled conditions mean controlled outcomes. If you are just starting or growing more, controlling the small areas in your monotub helps you stop side pins. It also helps you grow the most mushrooms. Make your environment perfect, and you will see smoother flushes, easier harvesting, and fewer bad surprises.
Look at Zombie Mushrooms’ selection of mycology-grade liners, clean growing gear, beginner-friendly grow kits, and lab-tested substrates. These can help you grow better.
Citations
O'Brien, M., Stone, M., & Hildebrand, Z. (2018). Environmental factors influencing mushroom fruiting: A review. Journal of Mycological Science, 42(3), 211–225.

